Revised:
You can customize many aspects of Expo's behavior and have your preferred settings become the defaults for subsequent sessions.
Some settings are kept as implicit defaults. For example, the setting of Window->Hide Inactive Documents is remembered across sessions, as are such things as the components of automatically generated names for data files. Others are set explicitly, through various panels, e.g., Expo->Preferences, or Data->Graph Options.
With the exception noted below, all persistent settings, whether explicitly or implicitly set, are stored individually for each user in the file org.lennie.expo.plist in the user's library folder (~/Library/Preferences). You can view this with the Property List Editor.
The preferences settings for monitors are common to all users and are stored in the shared file org.lennie.expo.plist in /Library/Preferences.
| You can remove all saved preferences and restore settings to their original defaults by holding down the Shift key as you start Expo. |
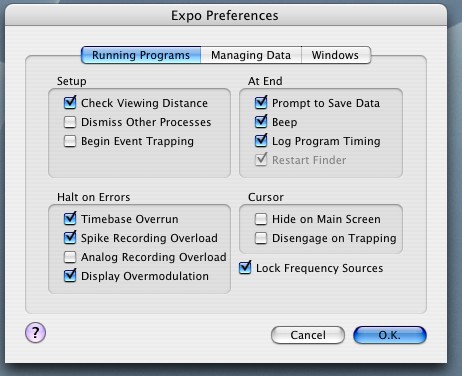
Most of the general preference settings are made through Expo->Preferences.
Viewing Distance. Expo needs to know the viewing distance to calculate image sizes correctly. To make Expo confirm, and if necessary adjust, the viewing distance before running any program that uses a display, check Check Viewing Distance.
Dismissing Processes. Expo's time-critical operations are robust to interference from other applications. Nevertheless, you can make it dismiss other processes that have user interfaces before running a program. To enable this check Dismiss Other Processes.
Event Trapping. When Expo runs a program that uses keyboard or mouse input, it needs to trap events. By default, event trapping must be enabled explicitly after the program starts running. To enable event trapping automatically when the program starts, check Begin Event Trapping.
Saving Data. If a program has collected data and you have checked Prompt to Save Data Expo will prompt you to save the data when the program stops.
Program Termination. When a program stops Expo will beep if you check "Beep."
Program Timing. If you want to monitor the accuracy of Expo's timebase, check Log Program Timing. When this is checked, Expo will print on the Console (at the end of a run) summary statistics of the timebase ticks executed while the program was running. All measurements are in 100 µsec units—the unit Expo uses for timing events. The Console display shows:
The number of timebase ticks measured
The shortest tick [followed in square brackets by the index of that tick]
The longest tick [followed in square brackets by the index of that tick]
The mean tick duration
The standard deviation of the tick duration
Restarting the Finder. When you have set Expo to dismiss other process before running a program, you can check Restart Finder to bring the finder back automatically after a program has finished. (You can always start the Finder by choosing File->Launch Finder.)
Timebase Overrun. If Expo is unable to execute a complete pass through all the routines in the active state during a single timebase tick it signals a timebase overrun. An overrun is always prominently flagged in the program's Status window. Check Timebase Overrun to make Expo stop a program on an overrun.
Sound Recording Overload. The threads that record sound (for spike and analog recording) detect if they take too long to subsample and buffer the incoming signal. Check Spike Recording Overload or Analog Recording Overload to make Expo stop a program on overload.
Display Overmodulation. Stimulus chromaticity manipulations in either of the color spaces supported (LMS or DKL) can lead to the display being out of gamut. Check Display Overmodulation to make Expo stop a program on when an unrealizable chromaticity is requested.
Hiding the Cursor. When a program displays images on the main screen (the one with the menu bar) Expo will hide the cursor if you check Hide on Main Screen.
Disengaging the Cursor. When a program traps mouse movements the cursor normally follows the mouse. Check Disengage Cursor to make Expo disengage the cursor from the mouse whenever it starts trapping mouse movements. When event trapping ends, the cursor is reconnected to the mouse.
Routine parameters that generate temporal waveforms (e.g., grating drift rates, waveforms) by default normalize the frequencies they generate so that each cycle contains an integral number of timebase ticks. You can relax this constraint by unchecking Lock Frequency Sources.
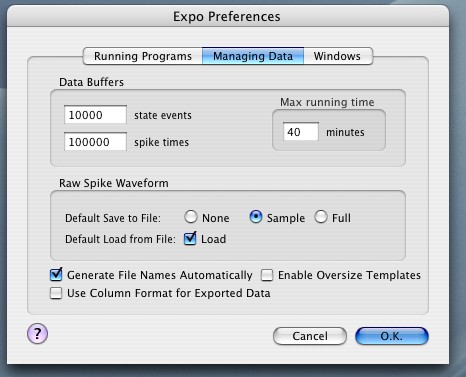
Data Buffers. Before running a program Expo allocates any buffers it needs for its event queues and data buffers. Expo will size buffers automatically if the program's running time is known. If the running time is unknown (or infinite) Expo uses values you specify to establish the sizes of its queues and buffers. You can set the sizes of the state event buffer and the spike time buffer. You can allocate a spike time buffer that will hold up to 5 million spikes (an extravagantly large number). The size of buffers for analog signals and raw spike waveforms are calculated from the number of minutes you specify for Max running time.
| If a running program fills any event queue or buffer it stops and issues a warning message. Accumulated data are preserved. |
Saving and Loading Spike Waveforms. The raw spike signal recorded by Expo is very large (typically 5.3Mb per minute per channel, reduced by 4 x when compressed). If the running program has buffered this signal, Expo asks, when it presents the 'Save' panel for saving data, saving data whether the raw signal should be saved too. You can save all of the signal, a 30 sec sample of it, or none of it. To specify the default behavior (i.e., the option initially set when Expo presents you with the Save panel) click the appropriate button under Default Save to File. When
Loading Spike Waveforms. Saved raw spike waveforms are large, and loading them from a data file can be slow. Unless you want to reanalyze spikes it is unnecessary to load them. Check Default Load from File to specify the option that is initially checked when Expo displays the Open panel to open a file. (This setting also governs Expo's behavior when you double-click a data file to open it, or choose it via File->Open Recent.) Raw wavefroms are never loaded from files during batch analysis of data.
Data File Names. If you check Generate File Names Automatically Expo will generate and suggest names for data files it saves, based on a root and numerical suffix that you specify through File->Data File Name….
Using Oversize Templates. Expo normally allows you to choose an analysis template (Data->Templates) only if it contains exactly the same number of rows as the data set being examined. If you check Enable Oversize Templates Expo will allow you to use a template that contains more rows than the data set.
Format of Exported data. When Expo exports data (via the clipboard, or in batch analysis), numbers are formatted by default as %g. If you check Use Column Format for Exported Data Expo will use the format in which the data are displayed in the analysis window.
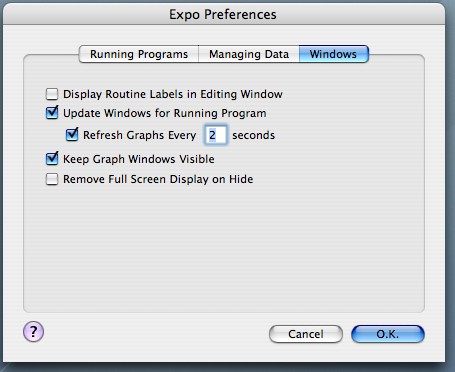
Viewing Routine Names and Labels. When you are creating or editing a program, cells in the table that lays out states normally show the names of their associated routines. Cells can instead show the labels (if any) you have assigned to routines. To enable the display of labels, check Display Routine Labels in Editing Window.
Updating Windows. Expo can analyze data as it is being accumulated by a running program, and it can keep the program log up-to-date. To make Expo refresh the displays in the analysis window and log windows as new passes through states are accumulated, check Update Windows for Running Program. If you are displaying a graph of data being accumulated by a running program, Expo will refresh the graph automatically if you check Refresh Graphs Every N seconds. The graph is updated only if new data are available.
Maintaining Graph Windows. When you have set Expo to hide all but the front most program (Windows->Hide Inactive Documents) Expo normally hides all the windows for other loaded programs and data. To keep visible any graph windows that would otherwise be hidden, check Keep Graph Windows Visible.
Removing the Full Screen Display. When you use a monitor other than the main screen, Expo normally leaves maintains its full screen display continuously. To remove the display when Expo is hidden, check Remove Full Screen Display on Hide.
Resources that Expo might need (images containing textures and masks, gamma correction tables for monitors; sounds of type .aiff) are loaded from files. For more information on video resources see Appendix A. Expo always looks for such resources in the Resources folder. This can be any folder readable by the user.
To specify the Resources folder choose Environment->Resources.
Expo automatically keeps track of changes in the contents of its Resources folder.
| The name of a resource file (excluding the path and extension) should contain no more than 14 characters. |
Once loaded, a resource is never automatically released. This might result in unused resources occupying a lot of memory. To purge all loaded resources (which are automatically reloaded as needed) choose Environment->Unload Resources.
To configure the monitor(s) on which Expo will display images, choose Environment->Monitors (this is dimmed if a program is running). Expo will display the panel shown below.
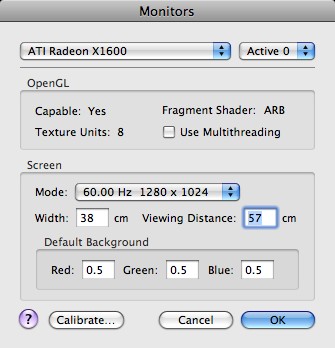
Choosing the Monitor. The Monitor popup menu identifies (by the make and type of its video driver) each monitor on the system (the first in the list is the main screen). Choose the one you want to configure. Use the popup menu to its right to make it active (choose Active 0).
| Expo has hooks to work with two monitors, but currently can use only one. The menu item Active 1 is always disabled. |
OpenGL. Expo requires several OpenGL capabilities before it can display images. Expo indicates whether these capabilities are available. It also shows how many multitexturing units are available (Expo needs at least 3), and whether or not the selected device supports texture fragment shading. Fragment shading hardware is required for displaying a Dot Field, a Surface Matrix or a Surface Overlay, and for controlling the opacity of Image Textures and Movie Textures). On computers with multiple processors, the OpenGL engine may be able to use more than one concurrently. To enable this, check Use Multithreading.
| Running OpenGL in multithreaded mode is likely to be beneficial only if you are drawing many objects. It can harm performance if you are drawing relatively few objects (an 'object' for this purpose is a Surface, a Dot Field, or a Surface Matrix). You should check that enabling multithreading actually improves performance. |
Screen. The Mode popup menu shows the available display modes (combinations of refresh rate, and display width and height (in pixels). Choose the one you want to use. Some flat panel displays driven via digital interface have no defined refresh rate. For such displays Expo shows a refresh rate of 60 Hz—the rate at which OpenGL will update them. If you have never set the mode, the values initially shown in the menu are the current settings. When Expo quits it restores settings to the values they had when it began.
Expo needs to know the physical width of the screen, and the viewing distance, to crrectly calculate the sizes of displayed objects. Set Width and Viewing Distance to the values you will use. (Via Expo->Preferences you can configure Expo to query you about viewing distance before it starts a program.)
You can specify the RGB values (each in the range 0-1) Expo will use for the default full-screen background it uses when displaying objects.
To set the monitor's calibration, click Calibrate… Expo will show this panel:
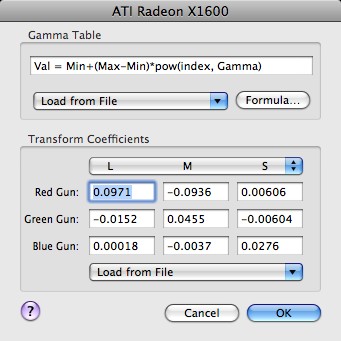
Gamma Correction. Expo can correct a monitor's gamma either by loading an inverse gamma table, or by using an inverse formula. To load a table (which must exist in a file in the Resources folder), choose from the Load From File drop-down list. The list is dimmed if no suitable file is in the folder.
| A gamma correction file should have the filename extension .gmma, and should contain a two-dimensional array [3 x N] of floating point numbers in text representation. Each number should be separated from the next by white space. The elements of the first dimension should be in the order R, G, B. Within each R, G, B, the N individual values should range from 0 to 1, with the first value being the lowest and the last the highest. |
You can provide a gamma correction by formula. Check Formula… to display a sheet through which you can enter for each gun the values from the power function that fits that gun. Expo assumes that the nonlinearity in each gun is described by
Output = Min+(Max-Min)*index^Exponent
where max and min range between 0 and 1. Enter in the table the inverse of the exponent that best fits the data.
Transform Coefficients. Expo needs transform coefficients to move from DKL or LMS color spaces to RGB. You can enter these coefficients directly, or can load them from files. Choose from the popup menu the set of coefficients you want to enter (L/M/S, or Achromatic/L-M/S) then either type in the values, or choose a file from which they are to be loaded. This file must exist in the Resources folder. The list is dimmed if no coefficient file is in the folder.
| A coefficients file should have the filename extension .coef and should contain a 3 x 3 array of floating point numbers in text representation. Each number should be separated from the next by white space. The elements of the first dimension are R, G and B. The elements of the second dimension are L,M,S, or Achromatic,L-M,S, etc. |
The timebase used to synchronize and update states in running programs can be derived from a monitor or from the OS X kernel clock. To specify the source of the timebase choose Environment–>Timebase (this is dimmed if a program is running). Expo will display the following panel:
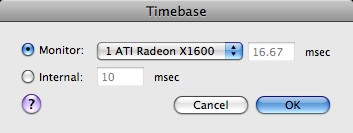
Choose the source you want to use. If you try to run a program that uses a monitor that is not also the source of the timebase, Expo will warn you.
If you choose an internal timebase the minimum tick duration is 4 msec.
Expo uses the timebase only to synchronize states; it does not rely on the timebase source for time measurement. All time measurements are derived directly from the OS X kernel clock.
For more information on the precision of timing, see Thread Timing.
The sound input hardware manages signals for recording spikes and playing back spike sounds. It can also be configured to provide continuously recorded analog signals. Expo can accept sound input from, and send output to, any device that supports CoreAudio, an OS X service for managing audio hardware. Beyond the built-in audio on the Mac, many low-cost, high-performance devices are available with Firewire, USB and PCI interfaces. Expo can handle up to eight input channels and eight output channels on each device.
To configure sound hardware choose Environment–>Sound (this is dimmed if a program is running). Expo will display the following panel.
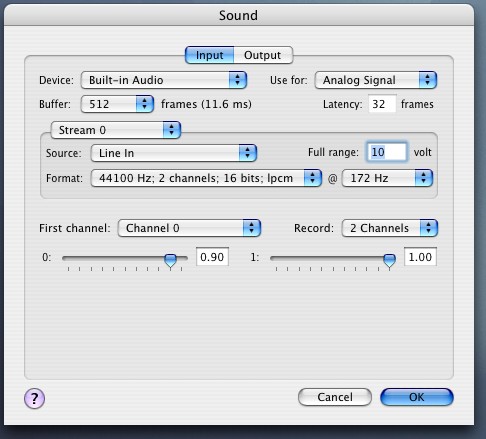
Choose the Input tab to configure sound input. The top-left popup menu shows all available audio input devices. Choose the one you want to use. The popup menu to the right determines how the chosen device will be used: not at all (Not Used), for spike recording (Spike Input), or for analog recording (Analog Input).
| Expo can manage analog recording via either a sound device or a National Instruments data acquisition card. If you have enabled input through both devices, Expo will always use the National Instruments card. |
Choose from the Buffer menu the size of the sampling buffer you want to use. Recorded signals are transferred to Expo in buffers of this size (a "frame" contains one sample from all channels being recorded).
"Latency" shows the time (in frames) between the signal getting to the device and its arrival in the buffer available to Expo. The time stamps on recorded waveforms reflect the time at which the signal was actually recorded.
Signal Source. Some devices can record sounds via multiple input subdevices or streams. If a device has multiple streams these are identified in the popup menu on the box that contains settings for Source and Format. Choosing from the stream popup menu displays information about the source and format of the signals recorded by that stream. If a stream can take signals from more than one source, the available signal sources are displayed in the Source popup menu. Choose the one you want to use. The Format popup menu shows the available source signal formats. Choose the one you want. Your setting will apply to all channels in all streams. Often the slowest sampling rate will be faster than you need, especially if you are recording analog signals. To make Expo subsample the signals, choose from the menu to the right the subsampled rate you want to use.
Voltage Range. CoreAudio delivers normalized signals to Expo, with the full input range represented by numbers in the range -1 to 1. In running programs and analyzing data you may wish to represent analog signals in volts. This information is not provided by CoreAudio, but you can enter the appropriate voltage at Full range. Expo will use the value in unit conversions. You can set the input range only for a device that will be used for sampling analog signals (not spike signals).
Input Channels. Expo can handle up to eight contiguous input channels on a device (these channels may span more than one stream). If more than eight channels are potentially available you can choose which eight to use. Choose the starting channel from the First channel popup menu and the number of channels you want to record from the Record menu. You should set to as few channels as you need, to minimize memory use.
For each available channel (up to eight), Expo displays a slider. If the channel's gain is adjustable you can set the gain with the slider or by typing in a value between 0 and 1 (you can also set the gain while displaying spikes in the Spike window). If a channel's gain is not adjustable, its control is dimmed. Some devices provide a single, master, gain control for all channels. On such devices setting the gain for any channel sets the gain for all of them.
Choose the Output tab to configure sound output. The top-left popup menu shows all available audio output devices. Choose the one you want to use. Choose from the next popup menu how the device is to be used (to provide spike sounds or analog output).
| Although the Output tab allows you to choose a starting channel on which output will be delivered, if you choose a channel other than 0, Expo will not correctly generate sounds. |
Choose from the Buffer popup menu the size of the sample buffer you want to use. Output signals are transferred from Expo in buffers of this size (each frame contains one sample from all channels being played).
Signal Destination. Some devices can play sounds through more than one output. If several are available, they are displayed in the Destination popup menu. Choose the one you want to use.| When spike sounds are played, they are delayed by approximately one buffer duration. Spike sounds might not be played correctly if the output device has a smaller buffer than the input device. |
Sound recording is managed by real-time threads, so that the waveforms can be continuously buffered. Expo detects any failure of the threads to keep up with the incoming signal, and will log a warning message on the console when this happens. You can configure Expo (Expo->Preferences) to abort any running program if the recording threads fail to keep up.
Expo can work with various PCI cards that provide analog and digital I/O. Cards must be configured and enabled before they can be used. To view and configure available cards, choose Environment–>Devices (this is dimmed if the computer has no device that Expo can use, or if a program is running). Expo will display a window that contains a tab for each device it can use.
Expo can use E-Series and M-series National Instruments PCI cards to read signals on up to 8 channels of analog input and deliver signals on two channels of analog output. It can also also read and write on 8 digital i/o lines.
| Expo can use the following E-Series cards: 6023E, 6024E, 6025E, 6030E (MIO-16XE-10), 6032E, 6034E, 6035E, 6036E, 6040E (MIO-16XE-4), 6052E, 6070E (MIO-16XE-1).
Expo can use the following M-Series cards: 6221, 6251. To control cards Expo uses the NI driver. The driver is provided with the Expo distribution in the 'NI Cards' folder. It must be installed before any NI device can be used. The driver is for E-Series and M-Series cards only. At present, Expo can use only a single NI device. If more than one device is present, Expo will display information about the first it discovers. If Expo cannot identify a card it will not make it available. |
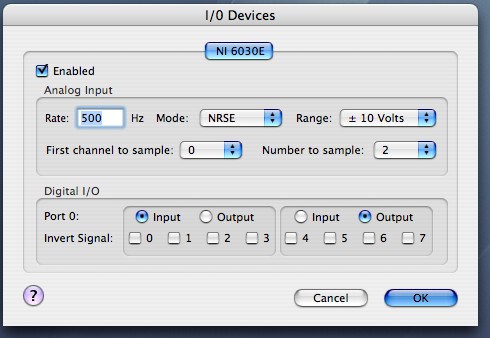
To make the device available for use check Enabled.
When the device is enabled Expo samples up to 8 channels of input (channels 0-7). To specify the rate at which each channel will be sampled set the sample Rate. To configure the type of recording (Differential, Non-Referenced Single Ended, Referenced Single Ended) choose from the Mode popup menu. To configure the gain, choose the input range from Range. To specify channels choose the First channel to sample and the number of channels from which signals will recorded. The most recently recorded input values are accessible to programs through the routine Analog Input. Signals on active input channels can also be continuously recorded by a program.
| Expo can manage analog recording via either a sound device or a National Instruments card. If you have enabled input through both devices, Expo will always use the National Instruments card. |
The two analog output lines are not configurable. They are accessible to programs through the routine Analog Output.
Choose Input or Output to specify whether a group of four digital IO lines is to be used for input or output. For each line you can configure the signal level (low or high) that is taken to be TRUE. Check the box for the appropriate line to invert the default sense.
The input and output lines are accessible to programs through the routines Digital Input and Digital Output.
| When mixing digital input and output in the same routine, only four bits are available for each direction, indexed from 0. For example, if Group 1 is configured for input and Group 2 is configured for output, you may read lines 0-3 as normal, but reads from lines 4-7 will return 0. Writes to lines 0-4 remap to ports 4-7 on the card. Writes to lines 4-7 are ignored. If the settings are inverted, so is the mapping. |
EXPO can read digital input lines to trigger the start or end of a state, or to trigger data capture (see Building a Schedule). If there is an active digital input device EXPO reserves two lines that it monitors when trigger operations are enabled:
Input line 0 is used to trigger the start of a state.
Input line 1 is used to trigger data capture and/or stop a state.
If there is an active digital output device EXPO reserves one line:
Output line 0 is set TRUE when the thread that maintains routine activity during a state is activated on each timebase tick. The line is set FALSE when the thread suspends itself. You can use this signal to synch external devices to the timebase, and/or to see how long it takes EXPO to do the core computation involved in maintaining a state.
Expo can use Fishcamp Engineering's FPCI-DIO96 card to provide digital I/O.
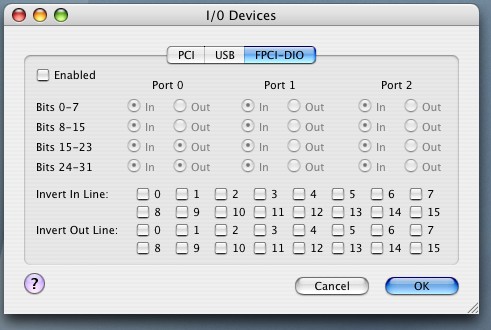
The card has 96 digital lines in three 32-bit ports. Each port can be configured (in byte units) for input or output. Expo currently uses only port 0, and sets its lower two bytes for input and its higher two bytes for output. You can view, but cannot change, the port configuration.
To make the card available for use check Enabled.
For each of the 16 lines of input and the 16 lines of output you can configure the signal level (low or high) that is taken to be TRUE. Check the box for the appropriate line to invert the default sense.
The input and output lines are accessible to programs through the routines Digital Input and Digital Output. (See the note above about reserved input and output lines).
| If both a National Instruments card and a FPCI-DIO96 card are present on the system, and both are enabled, Expo will always use the National Instruments one for digital I/O. |
Expo can record analog signals through any device that supports CoreAudio (see Sound) or through a National Instruments card (see Cards). If you are using analog signals to record eye-positions you may wish to have them represented in degrees. To make the appropriate conversion Expo has to know the scale factor for converting volts to degrees. To provide this, choose Environment–>Calibration (this is dimmed if no analog input device is enabled, or if a program is running). Expo will display the panel shown below.
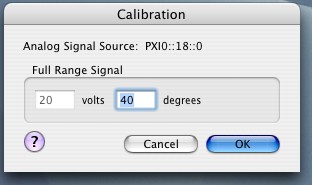
Expo displays the full signal range in volts (this is configured via Sound or Cards settings, depending on the source of the signal); enter the number of degrees to be represented by that range.
Expo can use any serial ports known to OS X. These will typically be provided via a USB->Serial converter. At present Expo uses one serial port to control the microdrive and a second to control a recording amplifier.
| A Keyspan USB-Serial adapter with old Macintosh circular connectors does not provide RTS/DSR flow control signals. To handle these signals you need an adaptor that has a DB9 connector. All adapters provide CTS/DTR control signals. |
To configure serial ports, choose Environment->Serial Ports. This item is dimmed if none are available. Expo will display this window:
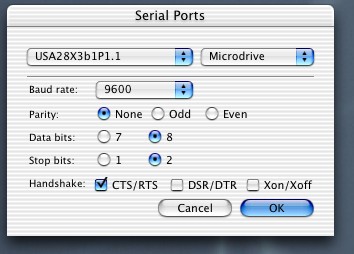
Choose from the left-hand pop-up menu at the top of the window the serial port you want to configure. Choose from the right-hand pop-up menu the device you want to control with it.
Provide other settings as appropriate for the device you want to control.