Revised:
Expo can record spikes on up to eight signal channels concurrently, at sampling rates determined by the user. To do this Expo uses sound recording hardware (built-in to the Macintosh, or an external device) that supports CoreAudio. To configure sound input choose Environment->Sound.
Expo can save both the times at which spikes are detected, and the continuous analog signal from which spike times are derived (in which case spike times can be reanalyzed off-line).
| A program will record the raw analog signal and/or spike times in event queues only when at least one slot in the program schedule specifies that these should be recorded. |
When spike recording is enabled Expo examines the analog signal to detect fluctuations that exceed a specified threshold, either positive or negative. When the signal exceeds the threshold Expo tries to match it to a user-defined spike template(s), and if the match is successful puts the times of occurrence of spikes in an event queue.
Before spikes can be recorded you must construct the templates Expo uses to detect them. To do this choose Signals->View Spikes. (This menu item is dimmed if Expo has not been configured to enable sound recording.) Expo will display a window like this:
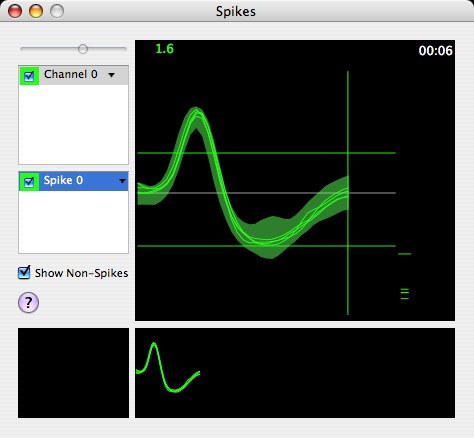
The window can display signals from up to eight input channels, depending on how many have been enabled for input via Environment->Sound.
The upper table displays a row for each enabled channel. Each row contains two controls, which become active when the row is selected:
The slider above the table controls the gain of the selected channel. If gain cannot be set for individual channels, but a master control sets the gain for all channels, the slider operates that. The slider is dimmed if no channel is selected, or if the gain of the sound input device cannot be adjusted.
For each active channel Expo displays, in addition to the signal waveform, two horizontal lines and one vertical one. The horizontal lines are movable threshold markers (one positive, the other negative). When you pass the cursor over either line it changes to a double-headed arrow, and you can drag the line up or down in its half of the window. If you drag either line to its maximum excursion, the corresponding threshold is disabled.
When Expo opens the spike window, it seeks any input signals that exceed the smaller of the two thresholds (positive or negative) identified by the horizontal lines. For every signal that crosses this threshold, Expo looks back 20-40 µsec, and forward for an amount of time specified by the position of the vertical line in the window (you can drag this line horizontally) and delivers the resulting segment of waveform for display. The interval ("neighborhood") defined by the position of the vertical line can be up to 2 msec long. Expo displays signal traces so that peaks (positive or negative, as appropriate) are aligned to the same time, regardless of the time at which the threshold was crossed.
In setting up it is useful to set a threshold (positive or negative) as you would the level discriminator of a conventional spike amplifier, so that Expo displays only traces that are candidate spikes (it doesn't much matter at this stage if several distinct spikes exceed the threshold). Expo always triggers its sampling on whichever threshold line is closer to zero. To disable either threshold, drag it to its limiting excursion.
Set the neighborhood limit so that it falls just on the end of the candidate spike—if the neighborhood is too large, and includes dead time beyond the end of the spike, Expo will detect spikes less reliably.
Whenever the spike window is active, it provides a continuous display of the rate (in impulses/sec) at which threshold crossings occur on each active channel. This number is always correct, even if Expo is not displaying every spike.
Expo displays every waveform segment that crosses the threshold of the relevant channel.
Each segment has a displayed lifetime whose duration you can specify via Signals->Configure Spikes. The default life is 2 sec.
You can control the maximum number of traces displayed by choosing Signals->Configure Spikes (the default is to display the 15 most recent traces).
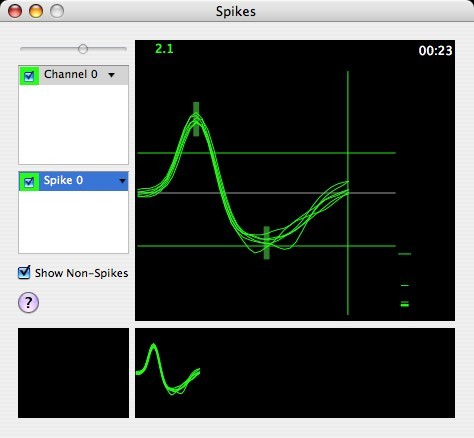
Expo recognizes a spike by matching it to a template. Expo can work with up to four templates concurrently. Templates are arbitrarily associated with channels: multiple spikes identified by different templates may be recorded from a single channel or different channels—Expo knows the channel used by each template. Spikes matched by a template, and placed in the spike queue, identify the templates and the channels associated with them.
After you have built a template (see below) Expo calculates a goodness-of-fit criterion that it uses when comparing subsequent traces to the template. If the fit is better than the criterion, the trace is considered a match to the template, if it is poorer, the trace is rejected. If a trace meets the criteria for more than one template, it is assigned to the one with the smallest fit error. Rejected traces (those that meet the criterion for no template) are displayed in the small panel at the bottom left-hand corner of the window. Traces that match templates 1 through 4 are displayed in successive panels to the right.
For each trace that is compared against the template, Expo will draw, on the right side of the main panel, a small horizontal bar that indicates the goodness of fit (the lower the bar in the window, the better the fit—see figure above). The criterion is identified by a slightly wider horizontal line; bars that lie below it represent spikes, those above represent rejected traces. You can adjust the criterion by dragging the line up or down in the window. Dragging the criterion line to its upper limit causes all traces to be accepted as fitting the template.
You can define a template either by averaging the traces currently displayed in the main panel, or by defining boxes through which the spike trace must pass. By default Expo builds a continuous template by averaging traces. To change the default template type, choose Signals->Configure Spikes and select Boxes, or right-click in the main panel and choose Box Templates.
| At least two spike traces must be visible in the main panel before you can define a template. |
If you have a single well-isolated spike, and the threshold and neighborhood set appropriately, the simplest way to define a template is to build it from the average of the traces displayed in the window. The number of traces averaged in the template is the number displayed; you can change that number with Trace Count. You can create the template in one of two ways:
When Expo has built a template it will create an entry in the lower table and (depending on preferences settings) will display the template as a shaded object behind the traces used to construct it (see figure above). The template's upper and lower bounds identify the average criterion limits (the criterion is actually specified by rms error, and the display provides only a rough guide). The template is not adjustable. You can hide the template by unchecking Show Template from the spike's drop-down list.
You can rebuild an existing template by choosing Rebuild Template from the drop-down menu for relevant row in the spike table.
If you have multiple spikes, or poorly isolated ones, you can isolate a spike with a template that consists of a set rectangular boxes through which its trace must pass. (If Expo is not already configured to use box templates, choose Signals->Configure Spikes and select Boxes, or right-click in the main panel and choose Box Templates).
To define a template choose Build Template from the drop-down menu for the relevant channel, or drag the entry from the channel table to the spike table. Expo will analyze the visible traces and place two boxes on the main panel at the maximum and minimum of the average trace:
You can make arbitrary adjustments to the template:
To abort any adjustment that you have under way, drag the mouse outside the main panel and release it.
If Expo is displaying traces of multiple, relatively distinguishable, spikes, you can use cluster analysis to generate in a single operation a set of templates to match all of them. Start by choosing Build from Clusters… from the Signals menu. Expo will drop a sheet with a pop-up menu that you should use to specify the number of clusters (up to eight) that you want to discover. Then click Build. Expo will sample and analyze the traces, after which it will create the required number of templates and apply them to the traces displayed in the spike window.
The spikes that fit each of the first four templates are displayed in panels along the bottom of the window, and the fits to each of the first four templates are displayed in columns to the right of the main display.
It may not be possible to determine in advance the number of spikes that are present; if you specify a number of clusters that does not match the number of spikes, Expo will not find adequate templates. After Expo has formed clusters it displays a table of Partition Errors, which show the rms errors found by forcing spikes into one, two … N clusters. The smallest number of clusters at which the error drops suddenly is the number to use. If the clusters are unsatisfactory, you can choose a different number and rebuild them.
If the result of the cluster analysis is satisfactory, dismiss the sheet with OK. To cancel the analysis (and restore any previous templates) dismiss the sheet with Cancel.
You can control what is displayed in the main panel of the spike window, where you set thresholds and the neighborhood.
When you first open the spike window, Expo displays threshold crossings that are unclassified. After you have defined a template, traces for that channel are classified as spikes or non-spikes. By default, Expo displays both kinds of traces, but you can show or hide a particular type of trace. To show or hide the trace for a particular spike, choose it from the appropriate drop-down list; to show or hide non-spikes, check Show Non-Spikes.
When Expo builds (or rebuilds) a template by averaging traces in the main panel, it averages those that are on display, so you can use the above commands to control the kinds of traces that will be counted in the average. For example, you can build a provisional template from all traces, then you can refine the template by displaying only traces classified as spikes and building the template again.
To control the number and duration of traces on display, choose Signals->Configure Spikes. Expo will display this panel:
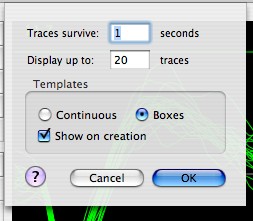
To specify the lifetime of each trace, set Traces survive. The default life is 1 sec.
To specify the maximum number of traces displayed set Display up to: The default is to display the 20 most recent traces.
To view any template choose Show Template from the drop-down list for the appropriate spike. To hide any displayed template, simply choose Show Template again from the list. To show or hide all templates, right-click on the main panel and choose Show All Templates or Hide All Templates.
To remove a template, choose Clear Template from the drop-down list.
To clear all templates right-click on the main panel and choose Clear All Templates.
If you have more than one template active for a single input channel, Expo compares every candidate spike trace against each template. If the trace satisfies the criterion for more than one template, it is assigned to the one with the least error in the match. Non-spikes are simply traces that meet no criterion.
For each active channel Expo can generate a tone pulse in the audio output when the sampled waveform crosses the threshold. You can feed this signal to an audio amplifier. To enable output sound for a threshold crossing, choose Threshold Sound from the drop-down list for the appropriate channel.
For each threshold crossing that matches a spike template, Expo can generate a tone to identify the spike. To enable a tone for a matched spike, choose Spike Sound from the drop-down list for the appropriate spike template.
If the output device has two or more channels, threshold sounds are played through the left channel and spike sounds are played through the right channel. Different spikes have different pitches; the threshold sound has a lower pitch than any spike.
| Expo generates tones only when sound output has been enabled via the configuration for sound recording. If no sound device is active, the relevant items in the Spike and Channel menus are dimmed. |