Revised:
The following from Mehrdad Jazayeri (mjaz@u.washington.edu) describes a sample program that shows how to use Expo for work on awake behaving animals.
As for any program in Expo, you must define/create a set of states, place them in slots and setup the schedule to control the flow of the prgram. These basic steps are described in the Writing Programs.
The most important unit in most psychophysical experiments is a trial. In Expo, a trial is one pass over a slot or series of slots (placed in the schedule). Expo does not constrain how you organize the slot(s) in a trial. You can define the whole trial in one slot, or you can break it down into elements that together make up the trial and assign a slot to each of those elements. Since breaking down the trial into elements makes it easier subsequently to change the program and analyze data, the focus here will be on this implementation of a trial structure.
Consider an experiment where the subject fixates a central dot, and while maintaining fixation has to make a judgement about the presence or absence of a peripheral visual stimulus. The offset of the fixation point signals the subject to report his/her judgement by pressing one of two keys. The trial can be broken down into:
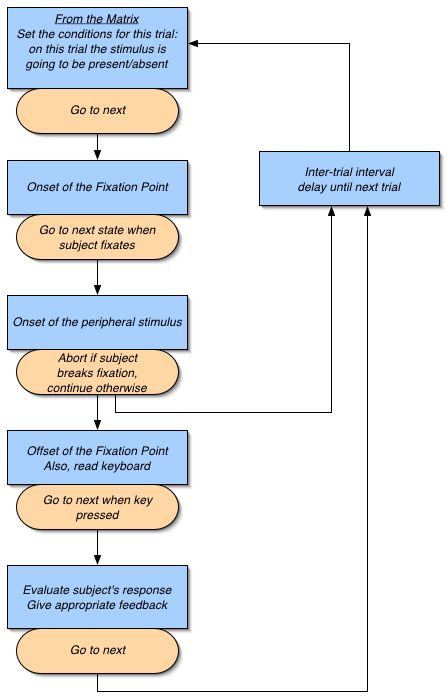
(1) onset of the fixation point; wait until subject fixates
(2) onset of the peripheral visual stimulus; check for maintained fixation
(3) offset of the fixation point; read the subject's keypress
(4) delay until the start of the next trial (inter-trial interval)
(5) go back to (1)
Within this overall structure, there are important details to consider. For each trial, you need a matrix that determines whether or not the peripheral visual stimulus is going to be present. In addition, you need to handle situations where the subject breaks fixation too early (for instance, by creating an abort state). You may also want to give trial-to-trial feedback as to whether or not the subject's judgement was correct. The following diagram shows a flowchart of the program. The blue boxes mark the states of the program each alloted to one slot in the schedule. The orange rounded boxes are the elements of the schedule; they connect these slots and control the flow of the program.
Now it is pretty straightforward to build this flowchart in Expo. The way we will do it is to build each state, drag it to the slot window and set its related scheduling.
The first state is a matrix whose substates contains all the different conditions (i.e., different values of all the independent variables) that are going to be used in the experiment. For our simple example, let's assume that our peripheral visual stimulus is a moving sinusoidal grating and our independent variable is its contrast, which will vary from 0% (stimulus absent) to 100% (stimulus suprathreshold). We want to know how the subject's response varies as a function of the stimulus contrast—we want to measure the psychometric function in a visual detection task (don't worry about the pitiful design of the experiment as here, we are only concerned with its implementation). For this example, we need a one-dimensional matrix that controls the contrast. The value of the contrast set by the matrix will be used later (in the third slot) to display the stimulus. This variable is set in an Op Variable routine. A global variable should be assigned to the Destination parameter of this routine so that later it can be used as the contrast of the displayed stimulus. Let us call this variable 'StimContrast'.
For this simple example, breaking down the trial into multiple components might seem a bit of an overkill. As an alternative, you could use the matrix in the third slot and dispense with the first slot altogether. However, for more complicated experiments with many interdependent independent variables, this design will be most flexible.
| For awake behaving and/or psychophysics experiments, a matrix defines all the possible independent variables/conditions of the experiment. While the program is running, right at the beginning of each trial, one element of the matrix chooses the set of variables for that trial. Note that although the value of the variables is set by the matrix, they are often used only later by states called in the subsequent slots. |
Drag this state to the first slot in the schedule. Set the duration of the slot via the Until tab and the transfer of control to Next via the GoTo tab.
The second state is used for (a) displaying the fixation point and (b) monitoring when the subject's eye enters a window around the fixation point. The display of the fixation point can be done by a pair of DKL Texture and Surface routines. Since we want the fixation point to remain on the screen in the subsequent slots, we can check the Persist option in the Surface routine.
Monitoring the eye position is done by the Analog Bounds routine. In this routine, the Mode should be set to Inside and the routine should Assert Stop. Checking the Assert Stop in the routine coupled with setting the Stop Asserted in the Until tab of the slot sheet ensures that the program will advance to the next state as soon as the subject fixates. Note that monitoring eye position needs special I/O hardware that can read the eye position and send it to Expo as an analog voltage signal. For a discussion on the hardwares supported refer to the discussion on Sampling Analog Signals and to configure Expo to use the analog input refer to Environment->Sound.
After creating the state, we drag-and-drop it to the second slot, set the slot time in the Until tab and check the Stop Asserted. Finally we set the GoTo tab to Next.
The third state (a) displays the stimulus and (b) monitors the eye position to ensure the subject remains fixated. The stimulus can be displayed by a pair of DKL Texture and Surface routines. You can choose the parameters of the texture (e.g. spatial frequency, elevation) and the surface (e.g. position and size) according to your experimental question. For the contrast of the texture however, you should use the variable name that specified the contrast in the first slot. In our example we used 'StimContrast'.
To monitor the position of the eye, you should add an Analog Bounds routine. In this state, since we want to check the subject does not break fixation, the Mode should be set to Outside and the routine should Assert Stop to abort if the subject breaks fixation (remember to check the Stop Asserted in the Until tab of the slot sheet). After moving the state to the third slot we have to set the schedule. Here, the schedule becomes a bit more complicated since we have a conditional branching scheme. The slot can terminate because of two reasons: either because the eye moved out of the fixation window (where the Assert Stop would terminate the slot) or because the the time alloted to the slot expired while subject maintained fixation. We consider the former case as an abort and would like to break the trial and move directly to the inter-trial interval (as depicted in the diagram). The latter case however, is a successful termination of the slot and therefore we would like to advance to the next slot.
This form of branching has been discussed in Building a Schedule, Transferring Control section of the help. The basic idea is that the program may branch off to one of two possible target states based on a given condition. You put one of the target states in the immediately succeeding slot and the other slot can be anywhere but needs to have a label; here, we label it as 'ITI' for inter-trial interval (refer to Labeling Slots). In the GoTo tab of the current slot sheet, you specify this label in the While tab you put your condition. Then the program will branch as follows:
| When the slot terminates, if the condition (specified in the While tab) is TRUE then GoTo the labelled slot (specified in the schedule window) else GoTo the succeding slot. |
In our example, what we want is: when slot terminates, if eye is outside the fixation window, go to 'ITI', otherwise advance to the next state. To perform our conditional test, we use the Destination parameter of the Analog Bounds which is going to be TRUE if eye is outside and FALSE if it is inside (note that we set the Mode to Outside). As a result, if the subject breaks fixation, due to the Assert Stop the slot will terminate and because the eye is outside, the control will go to the inter-trial interval. On the other hand, if the slot terminates normally, the condition will be FALSE and the program will advance to the next state.
The fourth state is when we (a) offset the fixation point and (b) read subject's response (a keypress). Since previously we used the persist option to display the fixation, here we have to cover the fixation point with a blank patch. This can be done by a pair of DKL Texture and Surface routines where the contrast of the texture is set to 0% and the surface covers the previously presented fixation point. Of course, the other option is not to make the fixation persist and to repeat displaying in all states needed.
To get the subject's response, we need a Read Key routine in this state. The help on Read Key describes how to set the parameters to read one of two keys as the subjects response. Checking the Assert Stop in this routine and checking the Stop Asserted in the Until tab of the slot sheet (after bringing this state into the slot window) would ensure that the program would advance immediately after the subject presses one of the keys.
A global variable name should be assigned to the Destination parameter of the Read Key routine. This variable name will be used in the next state to evaluate subject's performance and to give feedback. For this example, let us assume that we use 'SubjectResp' as the name of the variable. Also let us assume that we set up the Read Key routine such that the Destination parameter is 0 for pressing the 'a' key (to report the no stimulus condition) and 2 for pressing the 's' key (to report the presence of the stimulus). The 'SubjectResp' will carry this information to the next slot.
The fifth state compares the subject's response to the actual condition set by the matrix. The correct answer is to press 'a' for when the contrast of the stimulus is 0% and to press 's 'for all other conditions. To set up this conditional comparison, we need to construct the following If…Else… routine that generates a 1 for correct responses and a 0 for incorrect judgements. You can use routines very efficiently to perform this kind of conditional operations. Here, to give you the flavor of what can be done, one possible approach is described in some detail.
When 'StimContrast' > 0, the correct response is to press 's' and the incorrect response is to press 'a'. In other words, when StimContrast >0, the Destination of the Read Key routine, 'SubjectResp', is what we want to assign to the output of the If…Else… routine ('SubjectResp' is 1 for pressing 's' and 0 for pressing 'a'). On the other hand, when 'StimContrast' = 0, the situation is reversed: the correct response is to press 'a' ('SubjectResp' = 0) and the incorrect response is to press 's' ('SubjectResp' = 1). In other words, when 'StimContrast' = 0, we would like to assign 1-'SubjectResp' to the Destination of the If…Else… routine.
This all can be done in one If...Else... routine. Set the 'If' parameter to 'StimContrast'; 'Input 1' to 'SubjectResp' multiplied by -1 (refer to Auxiliary Constant section to see how you can modify parameter values by specifying an operation and a constant); 'Else If' to 0 (so that 'Input 2' is always ignored) and 'Input 3' to 'SubjectResp' minus 1. Finally, we assign the variable name 'CorrectTrial' to the Destination parameter of this routine and we multiply it by -1. The outcome will be a 1 for correct responses and a 0 for incorrect ones.
To give feeback you can use whatever method you find appropriate. For demonstration here, let's generate a sound for correct trials and no sound for incorrect trials. We need a Sound routine. From the drop-down menu, set the type to 'Tink' (or whatever else you want) and the Delay parameter to 'CorrectTrial' minus 1. For incorrect trials, Delay = CorrectTrial-1 will become -1 and there will be no sound but for correct trials, Delay = CorrectTrial-1 will be 0 and therefore, a Tink sound will be generared immediately.
The sixth state which is labeled 'ITI' is essentially a dummy slot that puts some delay between trials. When this slot terminates, the control should go back to the first slot. Therefore, the first slot should be labeled as well. We label it as 'StartTrial' and then set the GoTo tab of the 'ITI' slot sheet to 'StartTrial'.